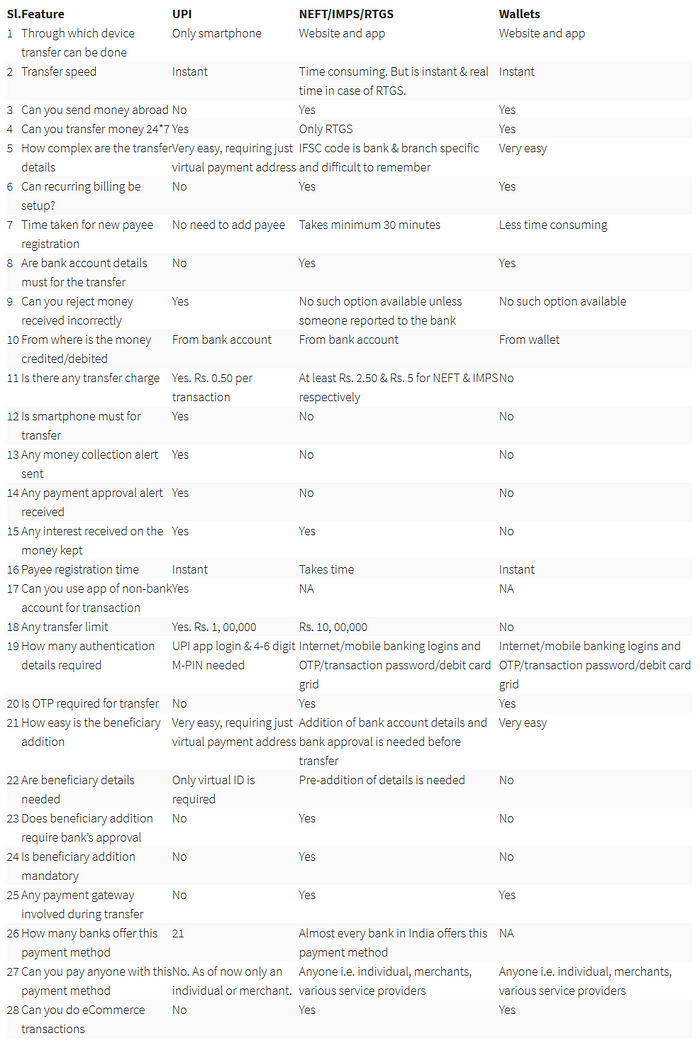
UPI, The Unified Payment Interface, is a very new money transaction term or method in the banking sector. A service that inter-operable in-between banks, and a big thanks to National Payments Corporation of India for building such a very incredible one. Now the UPI is live with 21 major banks in India and very sad thing is State Bank is not in the list now. But surely come on this list soon. Currently there are many payment or transaction services available like IMPS, NEFT, RTGS etc.. The UPI is a new born with extraordinary capabilities. Let’s discuss about more and more about UPI. I call it is an Ultimate Product of India.
What is UPI?
It is a true payment system that can be used at any time any where without any hassle. The UPI has the ability to transfer money between family, friends, or pay at shop or buy something from online or pay the rent of your home etc. instantly via safe and secure platform. In background the UPI is based on the IMPS system.
Difference in UPI?
UPI is a funds transfer technology which can be done via bank’s app on smartphone. Although such type of transfer already exists; the biggest differentiating factor is that the sender does not need receiver’s bank account details for sending the money. Only thing required is the virtual payment address.

How to get started?
Steps for Registration:
- Download UPI application from the App Store / Bank’s website
- Create profile by entering details like name, virtual id (payment address), password etc.
- Go to “Add/Link/Manage Bank Account” option and links the bank and account number with the virtual id
Generate MPIN:
Select bank account from which you want to initiate the transaction User clicks one of the options:
- Mobile Banking Registration/Generate MPIN
- Change M-PIN
For Registering or Generation MPIN:
- You will receive One Time Password (OTP) from the issuer bank on his/her registered mobile number
- You have to enter last 6 digits of debit card number and expiry date
- Enter OTP and preferred numeric MPIN (MPIN to be set) and clicks on ‘submit’
- After clicking submit, customer gets notification (successful or decline) for changing M-PIN
- Enters old MPIN and preferred new MPIN (MPIN to be set) and click on ‘Submit’
- After clicking submit, customer gets notification (successful or failure)
How a UPI transaction is performed:
PUSH — Sending money using virtual address:
- Log on to UPI application
- After successful login, select the option of Send Money/Payment
- Enter beneficiary’s/Payee virtual id and amount and select account to be debited
- You will get confirmation screen to review the payment details and clicks on ‘Confirm’
- Enter MPIN
- Get ‘successful’ or ‘failure’ message
PULL — Requesting money:
- Log in to the bank’s UPI application.
- After successful login, select the option of collect money (request for payment)
- Enter remitters/payer’s virtual id, amount and account to be credited
- You will get confirmation screen to review the payment details and clicks on confirm
- The payer will get the notification on his mobile for request money
- Payer now clicks on the notification and opens his banks UPI app where he reviews payment request
- Payer then decides to click on accept or decline
- In case of accept payment, payer will enter MPIN to authorise the transaction
- Transaction complete, payer gets ‘successful’ or ‘decline’ transaction notification
- Payee/requester gets notification and SMS from bank for credit of his bank account
